How to useContext to share React state between pages in Next.js
React Context and Next.js
Context in React is a great concept to pass in props from grandparents to children without having to pass props manually at each level.
In this article, we are going to explain how to use the context to share state with other pages when navigating from one page to another through an example in Next.js.
This is a more thorough article that you can refer to, if you would like a quick guide to set up react context and use it quickly in your app, check out [this article][7]
Customize _app
Since Next.js uses App to initialize pages, we are going to place our react context provider at the top level of our app, so that every child page will be wrapped by our context provider.
To create context in React, we will create a component called AppContext and call createContext from React which will create our context.
/components/AppContext
import {createContext} from 'react';

const AppContext = createContext();

export default AppContext;
Now, we are going to customize our app so that the context provider will be available for all pages
/pages/_app
import '../styles/globals.css';
import {useState} from 'react';
import AppContext from '../components/AppContext';

function MyApp({Component, pageProps}) {
	const [session, setSession] = useState();

	return (
		<AppContext.Provider value={{session, setSession}}>
			<Component {...pageProps} />
		</AppContext.Provider>
	);
}
export default MyApp;
Now let’s build two sample pages, one with an input form with a submit button that will takes us to the other page when we click on submit.
The goal is to get the value set in page 1 and make it available for page2
Share state between pages example
Let’s build our page1 which will be placed under pages folder
page1
import AppContext from '../components/AppContext';
import {useContext, useState} from 'react';
import Button from '@mui/material/Button';
import TextField from '@mui/material/TextField';
import {useRouter} from 'next/router';
import Box from '@mui/material/Box';

export default function Page1() {
	const [value, setValue] = useState();
	const context = useContext(AppContext);
	const router = useRouter();

	return (
		<>
			<Box
				component="form"
				sx={{
					'& .MuiTextField-root': {m: 1, width: '40ch'}
				}}
			>
				<TextField
					id="standard-helperText"
					label="input"
					onChange={(event) => setValue(event.target.value)}
				/>

				<Button
					size="large"
					className="text-white bg-blue-500 m-5"
					onClick={() => {
						context.setSession(value);
						router.push('/page2');
					}}
				>
					Next
				</Button>
			</Box>
		</>
	);
}
In the above page, we are using React hook useContext to get our context.
What has been typed by the user in the input form will be set on the context using the setSession
When we click on the button Next, we use the Next.js router to push route to page2.
Let’s see how page2 will be built
page2
import {useContext} from 'react';
import AppContext from '../components/AppContext';

export default function Page2() {
	const context = useContext(AppContext);
	return <div>{context.session}</div>;
}
In page2, we are getting the context, reading the session value and then render it as a div component
Test share state between pages
Now, Hit localhost:3000/page1 and type in for example hello from page1 and click next
The page look like 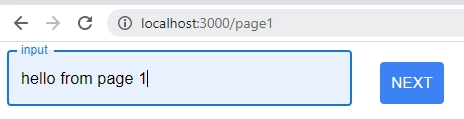
Now when next is clicked, you will be able to see 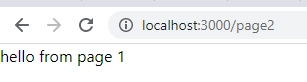
As you can see, we succeed to edit state in page1 and make it available for page2 in order to reuse it.
Conclusion
We have seen how to share states between pages in Next.js using React context, which is a great way to pass in objects from one page to another especially if the following page content depend on what has been typed in the previous page.
If you want to use context for simple apps, you can check my article in [this link][7]. it is more convenient for this manner.
It is worth mentioning that there are some proper state handler’s frameworks like Redux, but if you are looking for something out of the box using React power, then React hook useContext is the way to go.
Also, if your state that you want to pass in contains only some few variables, you can think of a much simpler solution by using the Next.js router, and destructure your variables in the next page. You can check my article about getting the URL query parameters in [this link][3]
Finally, if you love how material UI components are displayed like the textfield we have used here, you can check other assets about MUI in the links below:
- MUI datagrid with Next.js which let you work on data tables like sort and filter
- MUI search and autocomplete with Next.js, this component is used in this website in the top right corner to find and autocomplete articles
- MUI textfield validation with Next.js to validate content in textField using MUI API
- #useContext React
- #nextjs context api
- #nextjs context api example
