How to validate a material UI TextField in Next.js

In this tutorial, we are going to explain how to validate a material UI (MUI) text field in a React based app like Next.js
By following this tutorial you will be able to create your own textfield and validate it exactly like this link
-
Install Material UI
-
Create textField
-
Validate textField with a submit button
Now, let’s start
Material UI (MUI) textfield
Meterial UI (MUI) Text field is a space where the user can enter and edit text.
To install it use:
## npm

npm i @emotion/styled @emotion/react @mui/material

##yarn

yarn add @emotion/styled @emotion/react @mui/material
Create MUI TextField
To validate an MUI Text field, you need to :
-
Use the boolean prop required so textField will display a star next to the field to mean it is mandatory or required.
-
Display a custom error message when the user has put a wrong value, with using the prop error which takes a React.node as an argument.
-
use React hook useState so that error message will display only after submit button is clicked.
Now let’s see how we can do it with our e-mail text field validation example
Create a pages/validate-textfield.js and copy this content
import Box from '@mui/material/Box';
import TextField from '@mui/material/TextField';
import {useState} from 'react';
import Button from '@mui/material/Button';

export default () => {
	const [validateUrl, setValid] = useState({
		url: 'https://url.com',
		tempUrl: ''
	});

	const isUrlValid = (url) =>
		url.length < 2 || !url.includes('.') || !url.startsWith('http');

	const handleSubmit = () => {
		setValid({url: validateUrl.tempUrl, tempUrl: validateUrl.url});
	};
	return (
		<div className="flex flex-col text-center justify-center h-screen">
			<Box
				component="form"
				sx={{
					'& .MuiTextField-root': {m: 1, width: '40ch'}
				}}
			>
				<div>
					<TextField
						id="standard-helperText"
						label="base URL"
						required
						error={isUrlValid(validateUrl.url)}
						helperText={
							isUrlValid(validateUrl.url)
								? 'URL is not correct'
								: ''
						}
						onChange={(event) =>
							setValid({
								url: 'https://url.com',
								tempUrl: event.target.value
							})
						}
					/>
				</div>
				<div>
					<Button
						size="large"
						variant="contained"
						className="text-white bg-blue-500 m-3"
						onClick={handleSubmit}
					>
						Submit
					</Button>
				</div>
			</Box>
		</div>
	);
};
Customize MUI TextField for validation
To customize textField, use :
-
prop helperText which displays text to help the user understand what to put in the text field.
-
prop onChange to put what has been typed by the user in our React state to validate it later.
The CSS classes applied above are tailwindcss classes. Tailwindcss is a great framework for simple CSS classes, you can check how to integrate it with Next.js in [this link][3]
Test validation
Now hit localhost:3000/validate-textfield and type in ddd for example and submit
You should see a screen with red borders warning about wrong data being type in the text field like this 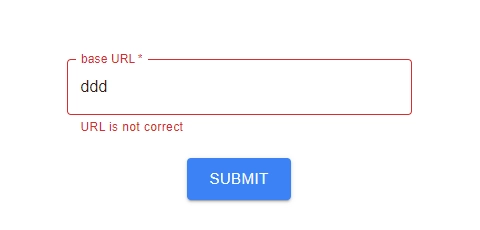
You can try it live as well on this link
To test the url validation, type an url starting with http, having a length >2 and contains a dot, and the url will be valid.
For our state, we are using an object with two keys, one for url and the other for the tempurl that the user will type in.
Once the user clicks submit button, we put whatever the client type in in the textField and we set it in the state.
React then renders again the component and finds out that what has been typed in (isUrlValid) does not return 0, so the error message is displayed.
Conclusion
We have seen how to make mui textField mandatory, and how to validate it using TextFIeld customization and React hooks.
Check out also these interesting articles about mui :
How to validate email with mui textfield
[How to make validation error with mui textfield][5]
How to make an mui textfield read only
